Showing posts with label Gardening. Show all posts

Saturday, February 16, 2013

Day 30: The Recycled Garden

Using Paper Products for Planting Seeds

It's always fun when you can reuse something in order to make another thing cheaper or more efficient. I saw the idea of using egg cartons and toilet paper rolls to grow seedlings in two different posts.  As I stated in earlier posts, my garden was a flop last year.  I'm hoping by planting many, many, many seeds inside, I will be avoiding birds and bugs that seemed to have foiled my garden plans last year.  

To get started, I just kept an egg carton and several toilet paper rolls.  I used baskets that we get our strawberries in to hold the rolls.

Then I gathered the kids around.

And gave them a bucket 'o dirt (AKA organic garden soil) and seeds.

Then I made them smile for the camera...

...and put them to work.

We planted sugar snap peas in the toilet paper rolls and lettuce in the egg carton.

We are now seeing the seedlings and it is so exciting, although I'm seeing that my kids were a little too generous with the amount of seeds they put in each hole.  Oh-well!

We have collected several more toilet paper rolls this week and plan to plant carrots, broccoli, and cucumber.  YUM!  (By the way, the toilet paper rolls can be planted right into the ground. They will break down.)

Using Diapers to Keep Potted Plants Moist


To do this, all you need is an unused diaper.  I always end up with extra newborn and size 1 diapers from every child because I over estimate or my infant goes through a sudden growth spurt.  You simply remove the plastic from the outside of the diaper.  All that you should have left is the "paper" part of the diaper.
I used two size 1 diapers to go on the bottom of this medium size pot.  After placing them in the bottom of the pot, you fill the pot up with soil and the plant.  I have noticed that the plant I used for this experiment does stay moist!  And, it holds the soil in the pot.  Bonus!


Using Fallen Leaves as Mulch

Plant with leaves (no weeds!!!)
Whoever thought of this idea and pinned it:  Thank you!  We lost our leaves within the last month.  It was late this year, but perfect timing.  We got much needed rain right after those leaves fell to the ground and I swept them all into the planters around the house.  I didn't have enough to cover our slope planters...
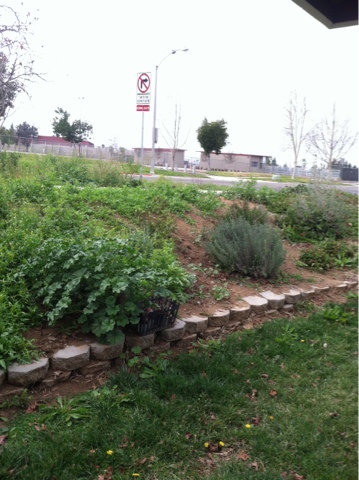
Planter without leaves (WEEDS!!!)
...and you sure can tell a difference!  Look at those weeds!  There were NO weeds in the planters that are covered with the leaves.  This is an amazingly easy and effective way to use your leaves.  I didn't have to go through the work of scooping them into the trashcan and they proved themselves worthy of a winter's stay in our yard!  (Just a note:  does use walnut tree leaves.  They omit a chemical that can be harmful to some living things, including other plants and humans.)  For more information about repurposing your leaves, visit Practical Stewardship.  

Due to lack of time, I couldn't try all the ideas out that I wanted to.  I still plan to use many of them, so I'll still share those ideas with you.  Here are just a few:

Using clear plastic containers as mini greenhouses

Using wine bottles to water potted plants (especially while away for a couple days)
(Go to Lettuce Share to get tutorial)

Using a cinderblock as a planter (I have a few laying around.)
Photo Source: http://artofgardeningbuffalo.blogspot.com/2011/02/cinder-planters.html


Just to remind you, I already wrote a post on regrowing from food scraps.  It works!  I am growing several celery plants and a lettuce head right now from scraps.  Its incredibly easy and worth the little effort it takes!
To view the post, please CLICK HERE.

And there you have it.  I hope this proves to be a useful resource to some of you! Here is to a fruitful year of gardening!


Wednesday, February 13, 2013

Day 27: DIY Hopscotch Garden Path

I spotted this idea on Pinterest a few months ago and pinned it right away because I thought my kids would love it.  I could not find a tutorial on how exactly to make your own Hopscotch, but I gave it a go anyways!
Supplies:
10 Square Pavers (Mine were laying around in my yard.)
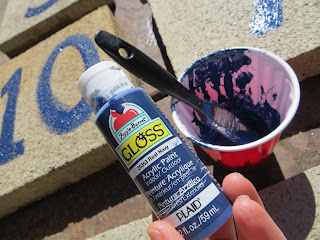
Acrylic Indoor/Outdoor Paint
1" Paint Brush
Disposable cup or bowl
Scrub brush

Step 1:  Have your kids Clean the pavers with water and a scrub brush.  Let dry.

Step 2:  While pavers are drying, if necessary, clear the area you will be using for hopscotch and make the ground level. 

On a side note, earth worms are very valuable to anyone who has a yard or garden, as they make the soil nice and rich.  We discovered plenty of them and the kids wanted to be sure we didn't hurt them.

So we performed Operation Save the Worms and put the worms in buckets of dirt and transplanted them to a nice area in our garden.

Step 3:   Hit the dirt with a flat shovel or stomp on it to make it nice and firm.  I just did squat jumps on mine.  That did the trick!  :)

Step 4: On dry pavers, paint numbers 1-10 with 1" brush.  Let Dry.

Step 5:  Move pavers to the spot you want them.  Make sure they don't move once you put them down (they should be level).

Step 6:  Shovel dirt back into all the area around and in-between the pavers.  Pack this dirt down very, very tight.  Keep stomping down the dirt until it is level with the pavers and can't been stomped down any more.  Brush of dirt with broom or scrub brush.
Step 7:  Step back and admire it.  Then let your kids enjoy it!

(Mine did!!!)


I still have quite a bit of dirt in the surrounding area to move and level, but overall, I like how this project turned out.  I'd like to plant some nice green ground cover between the pavers.  I think this will be a great addition to our backyard!

In case you were wondering, here is a link to how to play hopscotch!

Saturday, February 2, 2013

Day 16: Regrowing Food from Scraps

Last year, I worked very hard to produce a beautiful garden.  It was beautiful, green, and lush.  But, it lacked one thing.  It wasn't fruitful.  I was so disappointed when my beautiful tomato plants bore no fruit.  That's right.  Not even one tomato.  I was successful in growing basil, mint, and rosemary...oh and about 25 little strawberries, but that certainly isn't enough to feed a family.  Considering I planted seven tomato plants, three cucumber plants, eight green bean plants, two strawberry plants, and a couple of melon plants, I should have seen more fruit than I did!

This year, I am hoping to have more fruit.  A couple of weeks ago, I came across a pin that explained how to grow food from kitchen scraps.  I thought, "Why not?"  I would love to grow things from my scraps and perhaps not have to buy those items anymore.  About ten days ago, I followed the directions on wakeup-world.com to regrow celery from a celery stalk.  It is so simple!  I just put the stalk into a dish of water and filled the water up to cover all but a half inch of the stalk.  I made sure the top of the stalk was moistened on a daily basis.  Within a few days, leaves started to grow out of the stalk.  Now, about ten days later, there are little shoots growing up to form a new stalk of celery.  I planted it in moist soil and I am hoping to enjoy our first regrown celery in a couple of weeks!  It already smells so good!  Owen is very excited as well.  He loves watering our little plant everyday.  Next, I'd like to try regrowing onions, garlic, and potatoes!

Day 1
Day 7
Day 10
My little helper.