Showing posts with label Healthy Recipes. Show all posts

Monday, March 11, 2013

Busy Mom's Orange Chicken


The main ingredient of this Orange Chicken is, well, the chicken.  I understand that it probably is healthier for me to cut up my own chicken breasts, dip them in eggs and bread them with almond meal or something like that.  However, 355 days out of the year, I just don't have time for that.  So, the main ingredient for this meal is pictured below.  

That's right!  Trader Joe's saves the day, once again!  This tenderloins are actually very tasty and are around $7 a bag.  Well worth it to me!  By the way---an extra bonus is that these chicken breast are very low in sodium for a frozen item!  Although, the chicken is the main ingredient, it is all about the sauce, which is the homemade portion of this recipe, fresh squeezed OJ and all!

Busy Mom's Orange Chicken
Prep Time: 10 minutes
Cook Time: 25 minutes
Serves 8-10

Ingredients:
1 bag of Trader Joe's Breaded Tenderloin Chicken Breasts
Homemade Orange Chicken Sauce (recipe below)

Directions:
1) Heat oven to 400*F.
2) Spread chicken across a 9 x 13 casserole dish.
3) Put Chicken in oven for 10 minutes. (While chicken is cooking, prepare sauce!)
4)  Turn chicken over and cook for another 8 minutes.  
5)  Pour half of sauce over chicken.  Turn chicken over to make sure it is coated in the sauce.  
6)  Bake chicken for 7 minutes.  Pour most of the remaining sauce over chicken.  Garnish with green onions.  Enjoy!

Homemade Orange Chicken Sauce
1 1/2 cups water
2 Tablespoons Orange Juice (fresh squeezed)
1/4 cup lemon juice
1 Tablespoon orange zest  (Tip:  zest orange before juicing it.  A LOT easier!)
1 1/2 Tablespoon soy sauce
1/4 c honey
1/2 teaspoon minced garlic (fresh)
1/4 teaspoon ginger
2 Tablespoon white or rice vinegar
3 Tablespoon cornstarch
1/4 cup water

1)  In a saucepan, combine all ingredients except for the cornstarch and the 1/4 cup water.
2)  Turn on heat and bring to a boil.
3)  While the sauce in heating up, combine 3 T cornstarch with 1/4 cup water.
4)  Slowly mix cornstarch into sauce until it thickens.
5)  Pour over Chicken.  (Follow instructions above.)

If you are wondering what we eat this delicious Orange Chicken with, we always pair it with this rice medley from Trader Joe's.  It takes 3 minutes in a microwave for steamed rice.  Nothing beats that!  I make sautéed veggies to have with it most of the time, but tonight, I quartered Brussels Sprouts, put them in a 13 x 9 pan, sprinkled olive oil, sea salt, pepper, and fresh garlic and onions on it and put it in the oven with the chicken.  It took about 5 minutes more to bake than the chicken, but WOW!  It was worth it! 

If you use the whole bag of chicken, this meal feeds a good amount of people.  It tastes great the next day, so leftovers are always nice!  My husband is getting it in his lunch tomorrow!


Sunday, February 10, 2013

Day 24: Homemade Microwave Popcorn

Who would have guessed that 1/2 cup popcorn kernels plus a paper bag and a few minutes in the microwave equals a delicious snack?  This is so simple!  I actually just saw this in a pin a few days ago.  I just had to try it!
Instructions:
1)  Get a paper lunch bag.
2)  Put in the bag a 1/2 cup of kernels in the bag.  I chose these red popcorn kernels. 
3) Fold the bag over twice.
4)  Put it in the microwave for 2-3 minutes, or until the popping slows to 1-2 pops per second.  (My bag took 2 minutes.)
5) Sprinkle with a little salt and butter (we used Earth Balance Whipped Spread).  Shake in bag.
6)  Enjoy!


To view the tutorial I got the instructions from, please go to this link to Squawkfox.com.  There are a few ideas for popcorn toppings as well on the site.

Saturday, February 9, 2013

Day 23: Chocolate Chip Peanut Butter Cookies


I have a confession to make.  I tricked you.  I didn't put "Healthy" in the title just in case it would sway you from reading this post.  You see, these cookies are healthy.  They are "clean" and they are delicious!  If I were giving out awards for chocolate chip cookie recipes, this would win for healthiest, most creative, and perhaps one of the most tasty!

I first pinned this recipe back when I was a new pinned and though, "Ooohhh...I'm going to make those really soon!"  Several months later, I finally got around to it and I'm so glad I did!


The unique thing about these cookies is the main ingredient.  It's not flour.  It's not almond meal.  It's garbanzo beans.  That's right!  Chickpeas!  Who would have thought!?!  The recipe is found at a blog called Texanerin Baking.  And, I'm telling you these are delicious!  They are best hot out of the oven, or, they can be baked, frozen and heated up in the microwave and are tasty that way.  These cookies are packed with protein and only about 80 calories each.  Make sure to visit Texanerin Baking to get the recipe!  (I'm not posting here because I followed the recipe exactly, so Texanerin Baking gets all the credit!)


Monday, January 28, 2013

Day 11: Green Piña Colada Smoothie

I am all about smoothies. Since Troy and I started having one everyday last March, our health has improved in so many ways. We bought a Vitamix last May and have been making plenty of smoothies since. On Mondays, Troy and I have our normal morning smoothie for breakfast and another smoothie for dinner because Troy leaves 20 minutes after he gets home from work to teach an evening class. My desire is to be more creative with the dinner smoothie so we don't tire of the same smoothie. (To view my other smoothie recipes, please click here to visit Witness My Fitness!)

I looked up pineapple coconut smoothie recipes on Pinterest and discovered one that I thought I could modify. One rule I have for smoothie making is that I must include a vegetable. The original recipe didn't have veggies or protein. The smoothie I came up with turned out delicious! It was a nice change of flavor. It sort of took me back to Hawaii! So, here is the modified version of the recipe I pinned!

Green Piña Colada Smoothie
Yields 2 Smoothies at about 225 calories each

3/4 c. Unsweetened Vanilla Almond Milk
1 scoop of unflavored whey protein
1/4 cup unsweetened coconut flakes
2 cups frozen spinach
1 VERY* ripe banana
1 1/2 cups frozen pineapple
Handful of Ice

Add all ingredients to blender. Blend until smooth. Enjoy!

*Remember:  The browner the banana, the sweeter it is and the more antioxidants it contains!

(Owen approved of this smoothie recipe!)


Sunday, January 27, 2013

Day 10: Cookie Dough Bites

Clean eating can be fun.  No really.  It can.  I love to see what I can make out of really simple, healthy ingredients.

I found an article on healthy "late night" snacks on Pinterest.  I made these cookie dough bites the other night and was pleasantly surprised with how good they turned out!  There are very few ingredients and they take less than 5 minutes to make and a few minutes to chill.  Enjoy!

Cookie Dough Bites

Indredients:
(Yields 30 balls)

2 1/2 cups almond meal
1/4 tsp sea salt
10 Tbsp butter*
1 Tbsp vanilla
1/3 cup honey
3 Tbsp semisweet chocolate (chopped)
1/4 cup shredded coconut (optional---I added this because I LOVE COCONUT!)

Directions:

Mix all ingredients together.  Roll into balls and put onto wax paper on a cookie sheet.  Chill until firm. You can also freeze these babies for future late night snacks.  If you want to add a bit more sweetness, but more calories, you can dip them in melted semi-sweet chocolate.

*I am going to make these again this week and try making them with coconut oil.  I have a feeling it will work and taste scrumptious!  I will update the results!

Thursday, January 24, 2013

Day 7: Vegan Breakfast Cookies

My two oldest aren't big breakfast eaters.  I make pancakes because they ask for them, but they will eat a lot more pancakes if they eat them for dinner than breakfast.  They would rather have a nice big cup of chocolate milk.  I have yet to find a healthy option for that.  So, I'm going to the next best thing:  cookies!

Oh wow.  Wow!  I have to be truthful.  I just put these cookies in the oven and I had to step away to write this post because I kept eating the dough.  I have a feeling these won't just be "breakfast cookies" they are going to be "anytime" cookies!  The real test will be how much my children like them, though!

Here it goes!

Vegan Breakfast Cookies (Adapted from Diary of a Mad Crafter)
  • 1 1/4 cups regular rolled oats
  • 3/4 cup coconut flakes 
  • 1/2 teaspoon salt
  • 1 teaspoon cinnamon
  • 1/4 cup of almond meal (I use Trader Joe’s)
  • 2 tablespoons ground flax
  • 1/4 cup oat bran
  • 1/4 cup whole wheat flour
  • 1/3 cup raisins
  • 1/3 cup chopped walnuts
  • 1/3 cup chocolate chips
  • 3  very ripe bananas, mashed
  • 1/4 cup coconut oil
  • 1 teaspoon vanilla extract
 Preheat oven to 350F. Grease or line cookie sheet with foil.
Get the wet ingredients together, and then dry. Mix together until it comes together.   Using a 1/4 cup scoop, I dropped the dough onto my pan, and flattened them out with my fingers. If you get stuck to the dough, just dip your fingers in some water before flattening them.
Bake them for 20-25 minutes, or once they’ve browned. Let them cool on the pan for 10 minutes or so, and then move them to a cooling rack. Enjoy!

(Just to let you know, each cookie is about 215 calories, but high in healthy fats and protein!)
Update:  As I finished this post, they came out of the oven and I couldn't wait for them to cool.  They are oozy-gooey deliciousness!  Owen likes them, too!  Now, for the other kids...


Friday, January 18, 2013

Day 1: Coconut Sugar Scrub

I've been meaning to make this for some time now. My poor husband's hands are so dry and cracked from the dry "winter" weather we get here in Southern California (AKA the "Santa Ana Winds"). This is super simple. My five year old basically made it!

Ingredients:

Extra Virgin Coconut Oil
Sugar (I used coarse.)
Essential oils (Optional - I didn't have any)

1). Melt oil.
2). Stir in sugar until you make a paste. It is about a 2:1 ratio, sugar:oil.
3). To use, just gently rub into hands/feet/body/face and rinse with warm water. Keep sealed. A mason jar works great!

Results: My hands feel soft, but still dry. I know if I use this every night, it will improve! The real test will be my hubby's dry hands!

Saturday, February 25, 2012

Crustless Quiche

I LOVE this recipe for quiche! I promise you won't miss the crust!  Click here to visit my fitness blog, Witness My Fitness, for the recipe.  YUM!!!

Thursday, February 16, 2012

Rediscovering George (Foreman)


When my husband and I first got married, we purchased the famed George Foreman Grill.  We used it to grill our chicken breasts and turkey burners.  Trying to be healthy, we cooked a lot of chicken on the grill.  BLAH!  We got tired of it.  Personally, I think it dries out chicken breasts.  Chicken  breasts really aren't bad for you, anyway, so I suppose the George Foreman Grill is overkill when it comes to cooking that.  Needless to say, the grill found it's way to the back of our cabinet and stayed there.  I recently had the thought that I needed to get the grill out to put with the items we are selling at our garage sell.  But, with our griddle going out, I decided to use George for making grilled cheese/turkey sandwiches.  Guess what?  They turned out amazing AND they were pretty much pan-inis!  While making breakfast for dinner (a regular at our house) the other night, I decided to try to cook bacon in the George.  I have to admit that I remembered you could do this because I had just recently watched the episode of The Office when Michael Scott burns his foot on his George Forman grill while cooking bacon at his bedside.  I cooked the slices for 4 minutes on each side and it was seriously the tastiest bacon!  It was perfect in texture and taste, and I am guess a whole lot healthier for us since it wasn't cooked in the fat.  So, I suppose I will keep George a little longer.  He has proven to be a faithful and healthful cooking companion!

Wednesday, September 22, 2010

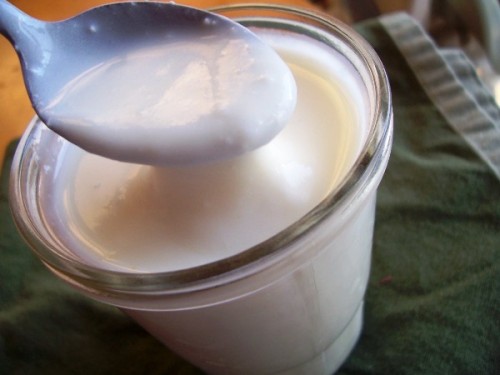
Crock Pot Yogurt

I just made some yogurt in my Crock Pot. I know that sounds strange but it worked really well!

Click here to find out how to make your own! (I let it culture for 13 1/2 hours...the recipe said for 8-12)

This is way cheaper than buying organic yogurt from the store and I love the simplicity of not hassling with a yogurt maker or anything like that. The texture was very smooth, almost like Greek yogurt. If you try it, let me know how yours turns out!

Saturday, January 30, 2010

Julia Child's Boeuf Bourguignon (WW Version)

Upon receiving a Weight Watchers magazine in the mail this week, I was thrilled to find a Weight Watchers version of Boeuf Bourguignon. It is Julia Child's recipe, with a healthier twist. The original is 17 points, and the WW version is 8. For those of you who aren't familiar with WW speak, 17 points is quite a bit! I have wanted to make this since Troy and I saw the movie Julie & Julia because it looked mouth-watering in the movie!

So, this week, I attempted to make it and succeeded! It wasn't a difficult recipe and I got the roast I used in it for $1.99 a lb! Score! For a little more Europen flair, I served the meal with Orangina, a French baguette, and a spinach salad.

Here is the recipe....enjoy!

Boeuf Bourguignon
(Taken from WW Magazine January/February 2010)

2 lbs bottom round roast, trimmed of fat and cut into 3/4-inch cubes
1/4 c all-purpose flour
1 Tbsp olive oil
1 (14 1/2 oz) can low-sodium beef broth
1 c red wine
1 (16-oz) package frozen pearl onions (I used 3 fresh brown onions and it was delish!)
1 (10-oz) package of cremini mushrooms (I couldn't find these, I used brown bella instead)
2 Tbsp tomato paste 4 garlic cloves, chopped 1 Tbsp chopped fresh thyme 1 bay leaf 1/2 tsp salt 1/4 tsp black pepper 1 lb carrots, thickly sliced 2 Tbsp chopped fresh flat-leaf parsley
*I also added 1 bag of Trader Joe's Fingerling Potatoes

Directions
1. Toss beef and flour in medium bowl until evenly coated. Heat oil in large Dutch oven over medium-high heat (I don't have one...a large pot with a lid works just fine!). Add beef, in batches if necessary, and cook, turning occasionally, until browned, about 6 minutes. Transfer to medium bowl with slotted spoon.
2. Add broth, wine, onions, mushrooms, tomato paste, garlic, thyme, bay leaf, salt, pepper; bring to a boil, scraping up browned bits from bottom of pot. Sir in beef and reduce heat. Cover and simmer 1 hour. Stir in carrots (and potatoes, if you are adding them). Cover and simmer until beef and vegetables are fork-tender, about 30 minutes. Serve, sprinkled with parsley.

Tuesday, November 10, 2009

Homemade Spiced Applesauce

A trip to Oak Glen this weekend resulted in a 5 dollar bag of grainy, somewhat mushy Arkansas Black apples. Although I was disappointed, and after I chucked two whole apples in the trash can, I was determined to do something with the rest. What can you do with a bunch of bad apples? I decided to make some applesauce. Here is the recipe I came up with, and, if I may say so myself, this is an extremely tasty and easy recipe!

Ingredients:
2 Tbsp. Pure Maple Syrup (NOT THE FAKE STUFF!!!)
1 tsp. Pure Vanilla
1/8 tsp. Ground Nutmeg
2 tsp. Ground Cinnamon
5-10 Apples (5 big or 10 small), peeled, cored, and diced
1/4 cup 100% Apple Juice
Cooking Spray

Directions:
Heat a large skillet on medium heat and coat with cooking spray. Add apples. Add apple juice. Add all spices. Add Maple Syrup and vanilla. Heat until apples are very, very soft, stirring often. Turn off heat. Mash slightly with a potato masher. Don't over mash...make sure there are still some chunks in the apple sauce. Enjoy warm or chill for a cold treat! Serves 6.

Oh, and one more tip: If you want to make some YUMMY apple cinnamon oatmeal, just add 1/2 cup applesauce to 1/2 cup plain instant oatmeal and 1 cup water. Add 1 more tablespoon of Maple Syrup and 1/2 a teaspoon more of Ground Cinnamon. Stir. Heat in the microwave for 4 minutes. Stir again. Serve with cold milk. Makes about 4 servings.

Monday, March 31, 2008

The BEST Chocolate Chip Cookie Recipe...EVER!

For years I have been on the search for just the right chocolate chip cookie recipe. Not too doughy, but now too hard...just the right amount of chewy goodness. It seems I have found it. I got the recipe off of allrecipes.com and tweaked it a bit (I always do!). I used whole wheat flour, so it is a bit healthier, and it is surprisingly delicious! My dad ate the cookies and enjoyed them...and I'm not sure if he noticed the difference in taste...which means there isn't much of a difference! I also used more vanilla. So, in the end the recipe turned out a bit different. Feel free to try to recipe yourself!
Ingredients:
1 c butter flavored shortening
2 eggs
3/4 c white sugar
3 teaspoons vanilla extract
3/4 c brown sugar
1 teaspoon salt
2 1/4 c whole wheat flour
2 cups milk chocolate chips
1 teaspoon baking soda

Directions:
1. Preheat oven to 350 degrees F. Grease cookie sheets.
2. In a large bowl, cream together the butter flavored shortening, brown sugar and white sugar until light and fluffy (beat them on med-low). Add the eggs on at a time, beating well with each addition, then stir in the vanilla.
3. Combine the flour, baking soda and salt; gradually stir into creamed mixture.
4. Fold in the chocolate chips.
5. Drop by rounded spoonfuls onto the prepared cookie sheets.
6. Bake for 8-10 minutes in the preheated oven, until light brown. Due to the fact that the dough is darker because of the wheat, it may be hard to tell what "light brown" is. Cookies will still be a bit doughy and light brown around the edges. DO NOT OVERCOOK! Allow cookies to cool on baking sheet for 5 minutes before removing to a wire rack to cool completely.

Thursday, September 13, 2007

White Bean Chicken Chili


In an effort to make Troy low cholesterol, low fat meals, I found this recipe on AllRecipes.com and I tweaked it a bit for more taste. I thought some of you would be interested in this recipe, seeing as it is healthy! (Note: Even the garnish can be healthier, with low fat cheese and Reduced Fat Daisy Sour Cream) I made it for my husband and a few friends and we all loved it. Click on the recipe card to make it bigger. You can even print the card out to add to your own recipe collection. Enjoy!