Showing posts with label Less Pinning More Doing. Show all posts

Friday, April 5, 2013

Pinterest Post: Ice Cube Tray Lunch

Jackson, Owen, and Madelyn's lunch trays!
Inspired by an idea on Pinterest where you put the kid's lunch in plastic Easter eggs, I discovered putting their lunch in ice cube trays.  Let me tell you, all my kids (ages 22 months, 3, and 5) loved this! They all sat and ate their lunch without getting up from the table.  When we eat outside, there are many distractions that beckon to my kids during meal time.  They didn't get up once.  This was a very exciting lunch event for them and I owe it all to Pinterest and ice cube trays!

To make this lunch, I just filled each spot on the tray with a veggie, fruit, nut, cheese, meat, Ezekiel bread, or dip.  I customized each try to each child's preference.  Jackson doesn't like hotdogs, but Madelyn and Owen do, so they both got organic beef hot dogs in their trays.  Jackson LOVES veggies, so his tray consisted mostly of veggies, whereas Madelyn and Owen got more fruit.

They all requested that I make them an ice cube tray lunch again.  And you know what?  I will!

They're excited, can't you tell?
All finished!  Although, she did give her brother her pistachios and celery.  Isn't she kind?


Monday, February 18, 2013

30 Days of Pinterest in Hindsight


I thoroughly enjoyed my doing my 30 Days of Pinterest posts.  I feel as if I found my creative side again.  Or, my need to be creative on a regular basis, rather.  I suppose I thrive on that sort of thing, and in the past 7 or 8 years, I have thrown it on the back burner, only to bring it up in a rush when planning a party or doing a shower for someone else.  It was nice just to be creative for me.  It was somewhat therapeutic to know that despite the tantrum(s) I endured that day, the dishes that continuously fill up my sink, the laundry that seems to grow out of hampers, or the (daily) vacuuming that one with toddlers and preschoolers must do, I could just sit and do something creative.  I could wrap my mind around something different for a change.  And the fact that I didn't get everything done all day is okay.  I don't need to feel guilty for doing a little project here and there, even though the dishes aren't done.
(I found this print on Pinterst, and the link only had the image, so no photo credit here.)
I had a few people say in the past month, "How do you do it all?"  The answer to that is simply, I don't!  I am learning that I not only need to give my kids, husband, and others grace, but myself as well.  Giving myself grace is the hardest of all.  If the dishes aren't done when Troy gets home from work, or the expectations that I have made for myself haven't been met by that time, it is so easy to beat myself up.  This is why I love the verse 2 Corinthians 12:9-10.  That God that His grace is all I need!  It is sufficient!   And, not only that, but His power is made perfect in weakness.  How, then, could I beat myself up for not getting the dishes done before dinner???
Photo credit: http://www.bethanyaleshire.com/2012/03/power-in-weakness_10.html
So, to all who have read my blog over the past month and wondered, "How does she do it all,"  just remember, I don't.  I still struggle with being gracious with myself.  I still struggle with the pride that comes crumbling down when other people see my weakness, or see my dirty dishes (gasp!).  I have to constantly remind myself that Christ has all that covered.

With that said, I will be doing a weekly Pinterest post as best I can in order to keep my creative side alive.  

For your convenience, here is a list of links to all the the 30 Days of Pinterest Posts:

Saturday, February 16, 2013

Day 30: The Recycled Garden

Using Paper Products for Planting Seeds

It's always fun when you can reuse something in order to make another thing cheaper or more efficient. I saw the idea of using egg cartons and toilet paper rolls to grow seedlings in two different posts.  As I stated in earlier posts, my garden was a flop last year.  I'm hoping by planting many, many, many seeds inside, I will be avoiding birds and bugs that seemed to have foiled my garden plans last year.  

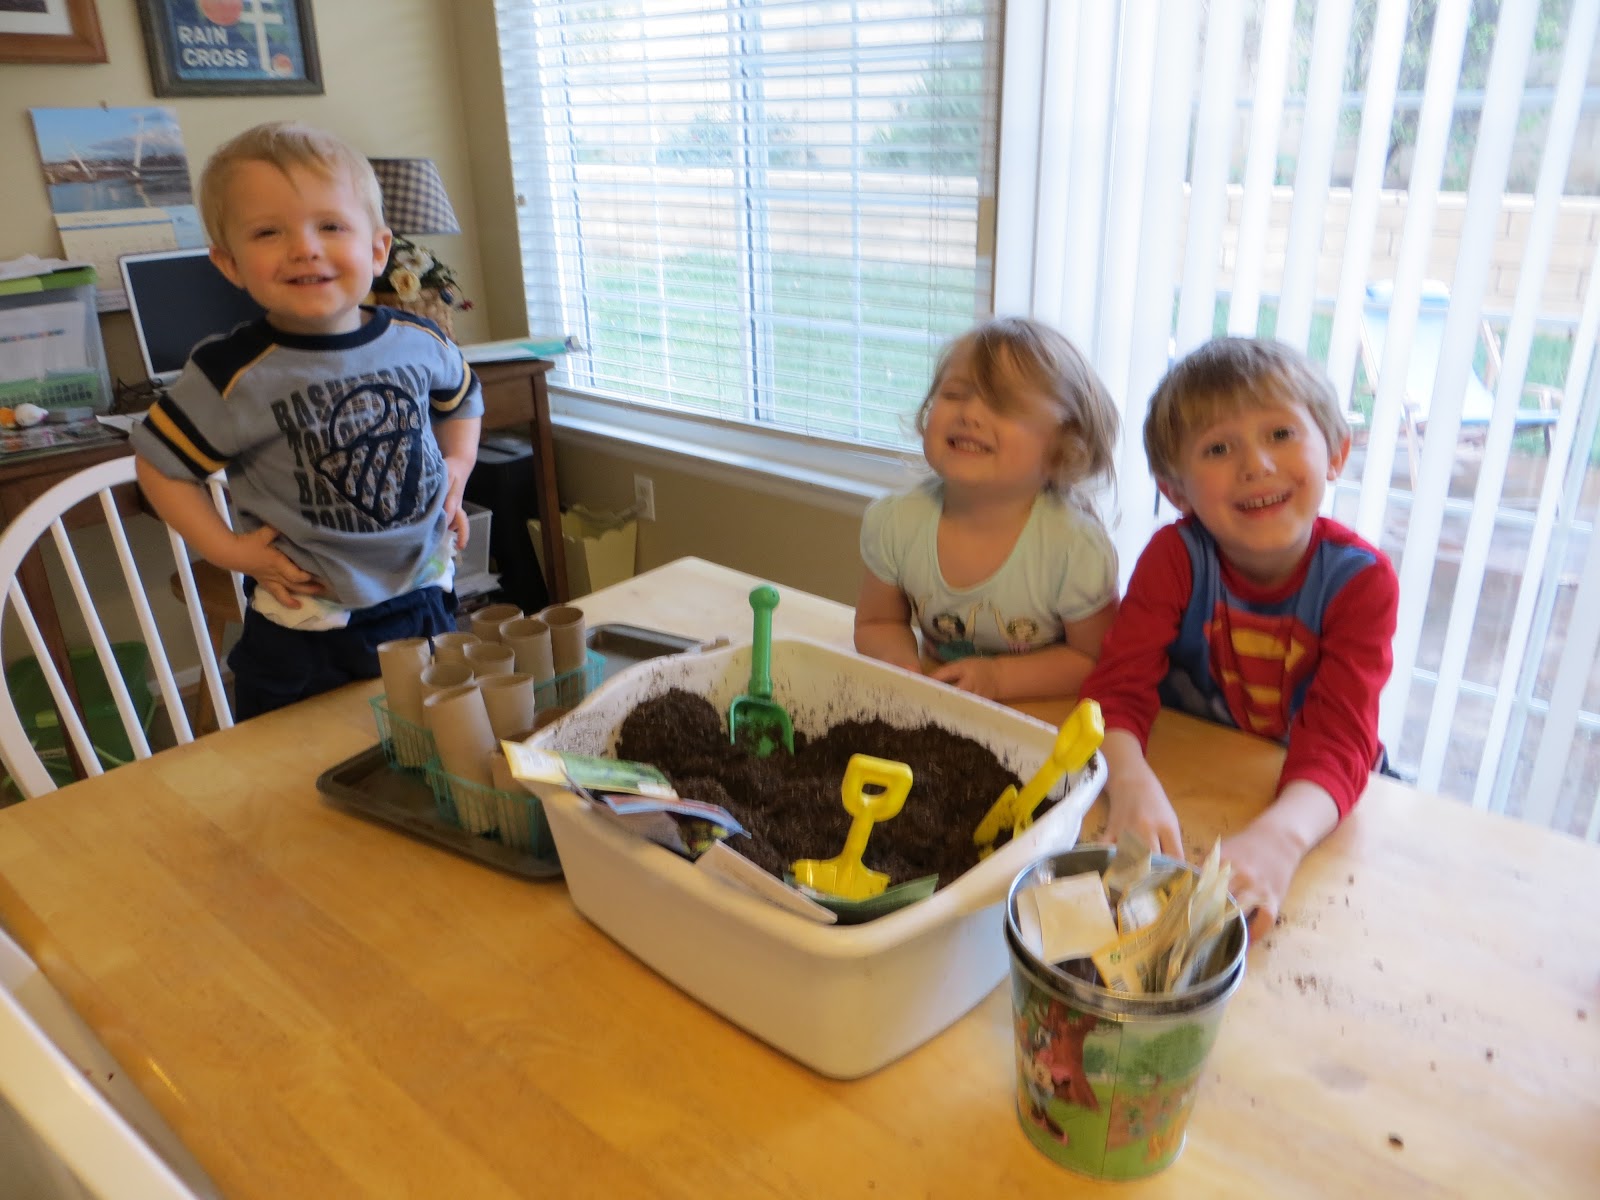
To get started, I just kept an egg carton and several toilet paper rolls.  I used baskets that we get our strawberries in to hold the rolls.

Then I gathered the kids around.

And gave them a bucket 'o dirt (AKA organic garden soil) and seeds.

Then I made them smile for the camera...

...and put them to work.

We planted sugar snap peas in the toilet paper rolls and lettuce in the egg carton.

We are now seeing the seedlings and it is so exciting, although I'm seeing that my kids were a little too generous with the amount of seeds they put in each hole.  Oh-well!

We have collected several more toilet paper rolls this week and plan to plant carrots, broccoli, and cucumber.  YUM!  (By the way, the toilet paper rolls can be planted right into the ground. They will break down.)

Using Diapers to Keep Potted Plants Moist


To do this, all you need is an unused diaper.  I always end up with extra newborn and size 1 diapers from every child because I over estimate or my infant goes through a sudden growth spurt.  You simply remove the plastic from the outside of the diaper.  All that you should have left is the "paper" part of the diaper.
I used two size 1 diapers to go on the bottom of this medium size pot.  After placing them in the bottom of the pot, you fill the pot up with soil and the plant.  I have noticed that the plant I used for this experiment does stay moist!  And, it holds the soil in the pot.  Bonus!


Using Fallen Leaves as Mulch

Plant with leaves (no weeds!!!)
Whoever thought of this idea and pinned it:  Thank you!  We lost our leaves within the last month.  It was late this year, but perfect timing.  We got much needed rain right after those leaves fell to the ground and I swept them all into the planters around the house.  I didn't have enough to cover our slope planters...

Planter without leaves (WEEDS!!!)
...and you sure can tell a difference!  Look at those weeds!  There were NO weeds in the planters that are covered with the leaves.  This is an amazingly easy and effective way to use your leaves.  I didn't have to go through the work of scooping them into the trashcan and they proved themselves worthy of a winter's stay in our yard!  (Just a note:  does use walnut tree leaves.  They omit a chemical that can be harmful to some living things, including other plants and humans.)  For more information about repurposing your leaves, visit Practical Stewardship.  

Due to lack of time, I couldn't try all the ideas out that I wanted to.  I still plan to use many of them, so I'll still share those ideas with you.  Here are just a few:

Using clear plastic containers as mini greenhouses

Using wine bottles to water potted plants (especially while away for a couple days)
(Go to Lettuce Share to get tutorial)

Using a cinderblock as a planter (I have a few laying around.)
Photo Source: http://artofgardeningbuffalo.blogspot.com/2011/02/cinder-planters.html


Just to remind you, I already wrote a post on regrowing from food scraps.  It works!  I am growing several celery plants and a lettuce head right now from scraps.  Its incredibly easy and worth the little effort it takes!
To view the post, please CLICK HERE.

And there you have it.  I hope this proves to be a useful resource to some of you! Here is to a fruitful year of gardening!


Friday, February 15, 2013

Day 29: Grilled Cheese

I always like to add an untraditional flare to the very traditional grilled cheese sandwich. So, how could I resist trying to make grilled cheese sandwiches in the toaster when I saw it on Pinterest?


Turned sideways, it looked like the toaster could accommodate a nice open faced grilled cheese. One word: FAIL! Two more words: burnt toast. The weight of the sandwich pressed up against the burners and started to smoke. This perhaps would work in another toaster, but certainly not mine.


I did, however discover that the waffle iron makes a great grilled cheese sandwich, with the help of Pinterest. It presses it much like a panini and the kids got a kick out of their sandwiches looking like waffles!

To do this, all you need to do is heat up your waffle iron and put the sandwich (buttered on both sides) into the iron for 3-4 minutes, or until your bread is golden brown.  Depending on the side of the waffle iron, you can put in more than one sandwich at a time.  This is a fun way to switch up a grilled cheese!


Thursday, February 14, 2013

Day 28: Family Valentine's Dinner

Last year, we started the tradition of having a family Valentine's Day dinner at home with our kids on Valentine's Day.  We never enjoyed going out because every place is so crowded and would much rather enjoy a date when everyone and their wife, girlfriend, or grandmother was out.  Also, this tradition is so fun!  Our kids have a blast and so do we.  It is a lot of preparation, but is so much better than going out!
I applied many pins this year.  The nice thing about Pinterest is there are people who pay close attention to detail.  Printable, free Valentines are available through Pinterest that can make those special details, like having homemade Valentines with your children's' favorite characters on them, so much easier to find and use!  (Click here for a bunch of free Valentine's Day Printables!)


For this card, I found the free chevron stripe printable HERE and the date to date calculator for date HERE.  The fact that you could have that calculated in seconds is amazing!
An idea I came across on Pinterest was to have heart themed pizzas.  How fun is that?  And how perfect for the kids!  I purchase the Bob's Red Mill gluten free pizza crust at Big Lots for a decent price.  The bag says to divide the batch into two balls, but I decided them into several balls, just big enough to roll out into a six inch circle so I could use a large cookie cutter to shape the dough.  Instead of baking the dough with the toppings on it for 15-18 minutes, as directed on the package, I baked it for 10.  The pizzas were smaller, so that was perfect.
To make the pepperoni (which is nitrate-free from Fresh & Easy) heart-shaped, fold the pepperoni in half, just like you would to make a paper heart, and cut out half of a heart from fold.  Unfold and you have a heart and a pepperoni with a heart-shaped hole.  Cute, huh?
Next, to make the salad special, I made the carrots heart shaped.  When I saw this on Pinterest, I HAD to do it  The hardest part was cutting the slit in the middle of the carrot.  After that, I just peeled the carrot to shape it.  Overall, it was pretty easy and added such a great detail!  Madelyn loved eating the carrot hearts!


And, of course, we ate by candlelight.  :)

After dinner, we played a few rounds of balloon volleyball, Valentine's Day Edition (the red balloon!).  Jackson said he wanted to play this every night.  I have to admit, it was so much fun!  (Again, this idea was from Pinterest.)
To set this balloon volleyball up, fold a twin sized sheet in half lengthwise, drape over  two chairs so it forms the "net."  Then tie the ends of the sheet to the leg of the each chair.  Be sure to blow up the balloon to a somewhat small size, so it is less likely to pop.


After volleyball, we finished the night off with brownies!

A bonus I didn't expect...my hubby gifted me Elyse Fitzpatrick's new devotion, a much needed and very pretty apron, and Thin Mints.  Yea!!!  

Pinterest was a nice addition to our family Valentine's Day tradition.  I'm happy I added those little details, and enjoyed the fact that the kids liked them too!


Wednesday, February 13, 2013

Day 27: DIY Hopscotch Garden Path

I spotted this idea on Pinterest a few months ago and pinned it right away because I thought my kids would love it.  I could not find a tutorial on how exactly to make your own Hopscotch, but I gave it a go anyways!
Supplies:
10 Square Pavers (Mine were laying around in my yard.)
Acrylic Indoor/Outdoor Paint
1" Paint Brush
Disposable cup or bowl
Scrub brush

Step 1:  Have your kids Clean the pavers with water and a scrub brush.  Let dry.

Step 2:  While pavers are drying, if necessary, clear the area you will be using for hopscotch and make the ground level. 

On a side note, earth worms are very valuable to anyone who has a yard or garden, as they make the soil nice and rich.  We discovered plenty of them and the kids wanted to be sure we didn't hurt them.

So we performed Operation Save the Worms and put the worms in buckets of dirt and transplanted them to a nice area in our garden.

Step 3:   Hit the dirt with a flat shovel or stomp on it to make it nice and firm.  I just did squat jumps on mine.  That did the trick!  :)

Step 4: On dry pavers, paint numbers 1-10 with 1" brush.  Let Dry.

Step 5:  Move pavers to the spot you want them.  Make sure they don't move once you put them down (they should be level).

Step 6:  Shovel dirt back into all the area around and in-between the pavers.  Pack this dirt down very, very tight.  Keep stomping down the dirt until it is level with the pavers and can't been stomped down any more.  Brush of dirt with broom or scrub brush.
Step 7:  Step back and admire it.  Then let your kids enjoy it!

(Mine did!!!)


I still have quite a bit of dirt in the surrounding area to move and level, but overall, I like how this project turned out.  I'd like to plant some nice green ground cover between the pavers.  I think this will be a great addition to our backyard!

In case you were wondering, here is a link to how to play hopscotch!