Showing posts with label DIY. Show all posts

Wednesday, February 13, 2013

Day 27: DIY Hopscotch Garden Path

I spotted this idea on Pinterest a few months ago and pinned it right away because I thought my kids would love it.  I could not find a tutorial on how exactly to make your own Hopscotch, but I gave it a go anyways!
Supplies:
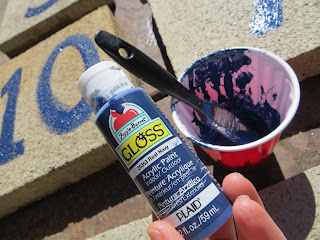
10 Square Pavers (Mine were laying around in my yard.)
Acrylic Indoor/Outdoor Paint
1" Paint Brush
Disposable cup or bowl
Scrub brush

Step 1:  Have your kids Clean the pavers with water and a scrub brush.  Let dry.

Step 2:  While pavers are drying, if necessary, clear the area you will be using for hopscotch and make the ground level. 

On a side note, earth worms are very valuable to anyone who has a yard or garden, as they make the soil nice and rich.  We discovered plenty of them and the kids wanted to be sure we didn't hurt them.

So we performed Operation Save the Worms and put the worms in buckets of dirt and transplanted them to a nice area in our garden.

Step 3:   Hit the dirt with a flat shovel or stomp on it to make it nice and firm.  I just did squat jumps on mine.  That did the trick!  :)

Step 4: On dry pavers, paint numbers 1-10 with 1" brush.  Let Dry.

Step 5:  Move pavers to the spot you want them.  Make sure they don't move once you put them down (they should be level).

Step 6:  Shovel dirt back into all the area around and in-between the pavers.  Pack this dirt down very, very tight.  Keep stomping down the dirt until it is level with the pavers and can't been stomped down any more.  Brush of dirt with broom or scrub brush.
Step 7:  Step back and admire it.  Then let your kids enjoy it!

(Mine did!!!)


I still have quite a bit of dirt in the surrounding area to move and level, but overall, I like how this project turned out.  I'd like to plant some nice green ground cover between the pavers.  I think this will be a great addition to our backyard!

In case you were wondering, here is a link to how to play hopscotch!

Tuesday, February 12, 2013

Day 26: Mod Podge Picture Frame

I have a lot of photo frames.  Sadly, they are all from the era in my life when I was just setting up my first house/apartment and I was afraid of patterns and colors.  I am no longer.  I decided it was time to add a little pizazz to my frames.  I started with a plain, black frame.  I followed the Mod Podge frame tutorial over at TidyMom.net.  I did change it up a bit because I didn't have one thing that her tutorial required.  Also, she used new frames that she stained herself.  I'm saving time and money here.  A month of Pinterest could make someone go broke if you don't watch it!  My goal was to spend very little money on my projects!

 Supplies:
Mod Podge
Cute Scrapbook Paper
Utility knife or exacto knife
Sponge Brush
Old frame
Old Credit Card
Cutting board
Sand Paper

Step 1:  Brush Mod Podge on frame.  Let "set" for 30 seconds.  Put another layer on.  Turn over and put frame onto the back of your scrapbook paper.

Step 2: Rub out all of the "bubbles" and bumps with an old credit card.

Step 3:  Cut along the edges of the frame.  Three slots for photos was kind of hard to cut around.  I don't recommend that.

Step 4:  See all the rough edges.  No need to worry!  Smooth out the edges with...

...your piece of sandpaper.  If you want to, you can scuff up the edges a bit.  I did, so the scrapbook paper ended up blending in nicely with the frame.

Step 5:  Cover front of frame with one last layer of Mod Podge to seal it.

Enjoy!  I think I may be doing this to a lot more of my frames!  This is much much better than just plain old black!


Sunday, February 10, 2013

Day 24: Homemade Microwave Popcorn

Who would have guessed that 1/2 cup popcorn kernels plus a paper bag and a few minutes in the microwave equals a delicious snack?  This is so simple!  I actually just saw this in a pin a few days ago.  I just had to try it!
Instructions:
1)  Get a paper lunch bag.
2)  Put in the bag a 1/2 cup of kernels in the bag.  I chose these red popcorn kernels. 
3) Fold the bag over twice.
4)  Put it in the microwave for 2-3 minutes, or until the popping slows to 1-2 pops per second.  (My bag took 2 minutes.)
5) Sprinkle with a little salt and butter (we used Earth Balance Whipped Spread).  Shake in bag.
6)  Enjoy!


To view the tutorial I got the instructions from, please go to this link to Squawkfox.com.  There are a few ideas for popcorn toppings as well on the site.

Thursday, February 7, 2013

Day 21: Felt Story Board Travel Case

This might just be the neatest thing since sliced bread. I always enjoyed the Bible felt board stories growing up in Sunday School. If you put me in a circle of kids with someone telling a Bible story with the felt board, I still would be enthralled today! There is just something about the way the felt sticks to itself.

Well, enough about that! Let's get to the project! I found this quite popular pin several months ago. I think this would be the perfect thing for my kids to play with during the sermon on Sundays. The original pin used it for traveling purposes and it was a generic story board with cars and houses and such. Bible stories make it interesting, I hope, for the kids. So, my plan is to make a few more of these, but today, I started with Jonah and the whale. Jackson requested this story. It was easy enough and I really, really, really enjoyed it---all the way down to making Jonah's sideburns!

Supplies:
Tacky Glue or Sewing/Fabric Glue
Mod Podge or white glue
Sponge Brush
Permanent, extra fine tip marker
Fabric Markers (optional)
Assorted Felt
Googly eyes (optional)
Fabric Scissors
Travel Wipe Case

Instructions:
1)  Trace the bottom of wipe case onto felt for background.
2)  Cut out felt background.
3)  Brush Mod Podge onto the back of the wipe case and stick on felt background.
4) Draw onto felt the characters and peices you will need to complete your story (pick any story!).
5)  Cut the peices out.  Any peices needing to be glued can be glued with Tacky Glue or fabric glue.
6)  Let all the felt dry.
7)  Put all the pieces into case and give to your child or secretly play with it yourself.  I did.  (I had to make sure Jonah fit into the whale's belly!)


Wednesday, February 6, 2013

Day 20: Mod Podge Letter

Today I wanted to do a simple, yet creative craft.  A Mod Podge pin came to mind, so I cracked open my first bottle of Mod Podge.  Is it true that it's just glue and water?  Did I just pay five bucks for that?

Seeing that he could get into that white sticky stuff, my five year old was eager to help.  This craft is very easy---perfect for kids to help out with.  They can practically do the whole craft themselves!  This is well worth the total of 10 minutes it takes to make!

Supplies:
12" Paper Letter (I got mine from JoAnn's for $3.99)
12" x 12"scrapbook paper
Matte Mod Podge
Acrylic paint
Sponge brushes
Scissors

Instructions:
1)  Trace letter onto scrapbook paper.
2)  Cut letter out.
3)  Paint sides of letter.  Painting the back is optional.  It depends on where and how it will be displayed.  Let dry.
4)  Apply Mod Podge to letter and put the letter cutout on top.
5)  Apply Mod Podge all over top of letter, working out any bubbles from underneath.  Mod Podge can be applied over the side of the letter, so everything looks nice and even.
6) Display and enjoy!

Jackson was a super-duper Mod Podge applier!  Just had to even things out a bit!  :)
Pretty, isn't it?


Tuesday, February 5, 2013

Day 19: DIY Chevron Striped Lampshade and Lamp Redo


Troy and I inherited a unique milk glass lamp from his grandma a few years ago.  I had visions for it ever since.  Unfortunately, it spent a while in the garage.  So, now it is time to bring it into the light!  (Again, pun intended.)  My plan for this lamp is to make it somewhat modern and nautical at the same time.  This is how I desire our "bonus room" to look.  
I found a clever pin on how to paint chevron stripes on a plain lampshade.  (View tutorial here.)  I followed the tutorial exactly, except I added tape to the top and bottom of the lamp shade because I wanted to keep that white.

I then taped off everything but the wood and whipped out the dark primer.  I used dark primer because the paint lady at Home Depot told me to use dark primer for dark paint.  

I then painted the shade a nice hue of yellow.  I was sure to paint gently, in a dabbing kind of motion.  The tutorial I followed said to use a stencil brush, but that costs money.  A sponge brush worked just fine! 

I painted the the base with a navy color.  I used a sponge brush on the base as well.  It left a smooth texture, but an uneven color.  I ended up liking the way it came out!  Next, I took the tape and paper off....
I love it!  I love the contrast of the navy, the milk glass, and the brass.  Nautical.  Classy.  And, of course, the chevron shade adds the "modern."
Oh!  And I forgot to add the best detail of all!  For this project, I only had to purchase the paint, which cost less than 3 dollars!

Monday, February 4, 2013

Day 18: Cleaning with Lemons

What do you do when the world gives you a small bag of a few over-ripe lemons?  You clean with them, of course!

The pins I used for this post I pinned quite some time ago.  I guess I needed a month of actually using the pins to put this to use!  Guess what?  Lemons are incredible for cleaning faucets, soap scum, water spots, tea stains, the air, and garbage disposals.  I know!  Who would have thought?  

The following group of pictures are the before/after photos of some of the faucets I cleaned today.  All I did to accomplish this task was simply cut a lemon in half and "scrub" the faucets with the lemon.  I then just rinse it off.  It was extremely easy.  I will be cleaning my faucets with lemons from now on. My faucets were REALLY dirty with water spots and soap scum.  It's very embarrassing.  But, I'm coming clean.  Pun intended.  

Before----------------------------After


Before

After  (amazing difference, right?)
The next thing I did with my trusty lemons was make a Crock Pot air freshener.  This is actually a pin I use all the time.  I switch up the ingredients, so to fit with today's theme of lemons, I chose lemon and rosemary.  I plucked a few rosemary sprigs from my garden.  To make this air freshener, you need a crock pot or you can use water in a sauce pan on the lowest heat. 

 Rosemary Lemon Air Freshener Ingredients:
2-3 Sprigs of fresh rosemary (dried may work, but because I have a monstrous rosemary plant, I've never tried it!)
1 Lemon, sliced
Baking Soda
Water to fill the pot

Instructions:  
1) Sprinkle bottom of pot with baking soda until covered
2)  Fill pot with water
3) Add sliced lemons and rosemary
4) Set heat on low (or plug in pot) and enjoy the aroma within ten minutes
5) You can enjoy this aroma for hours if you are using a Crock Pot.  If you are using a saucepan on the stove, you can turn it off when it starts to simmer and enjoy the aroma until it cools.

(Tea stains in mug)

The next cleaning venture I went on with lemons was to clean tea stains out of a mug.  To do this, I took the lemon half (which I had already used on the faucets) and sprinkled the peel with salt.  I then used the peel to scrub the tea. I rotated using the peel and what was left of the inside of the lemon.  Within 30 seconds, I rinsed the mug and it sparkled!

(Tea stains, no more!)
 And last, but certainly not least, I used those lemons that worked for cleaning my faucets and mugs to deodorize the garbage disposal.  Those lemons sure do go a long way!