Showing posts with label Kid Crafts. Show all posts

Wednesday, February 13, 2013

Day 27: DIY Hopscotch Garden Path

I spotted this idea on Pinterest a few months ago and pinned it right away because I thought my kids would love it.  I could not find a tutorial on how exactly to make your own Hopscotch, but I gave it a go anyways!
Supplies:
10 Square Pavers (Mine were laying around in my yard.)
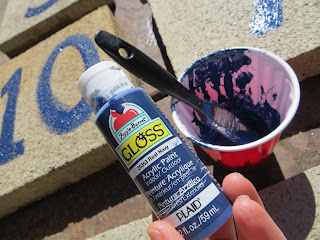
Acrylic Indoor/Outdoor Paint
1" Paint Brush
Disposable cup or bowl
Scrub brush

Step 1:  Have your kids Clean the pavers with water and a scrub brush.  Let dry.

Step 2:  While pavers are drying, if necessary, clear the area you will be using for hopscotch and make the ground level. 

On a side note, earth worms are very valuable to anyone who has a yard or garden, as they make the soil nice and rich.  We discovered plenty of them and the kids wanted to be sure we didn't hurt them.

So we performed Operation Save the Worms and put the worms in buckets of dirt and transplanted them to a nice area in our garden.

Step 3:   Hit the dirt with a flat shovel or stomp on it to make it nice and firm.  I just did squat jumps on mine.  That did the trick!  :)

Step 4: On dry pavers, paint numbers 1-10 with 1" brush.  Let Dry.

Step 5:  Move pavers to the spot you want them.  Make sure they don't move once you put them down (they should be level).

Step 6:  Shovel dirt back into all the area around and in-between the pavers.  Pack this dirt down very, very tight.  Keep stomping down the dirt until it is level with the pavers and can't been stomped down any more.  Brush of dirt with broom or scrub brush.
Step 7:  Step back and admire it.  Then let your kids enjoy it!

(Mine did!!!)


I still have quite a bit of dirt in the surrounding area to move and level, but overall, I like how this project turned out.  I'd like to plant some nice green ground cover between the pavers.  I think this will be a great addition to our backyard!

In case you were wondering, here is a link to how to play hopscotch!

Friday, February 8, 2013

Day 22: Watercolor Painting with Kids

After I cleaned the kids' paint up and put them down for a nap,
I painted for the first time in six years.  That's right.  Six years.
It's not my best work, but I enjoyed it so much!
 Why did I go six years without it?!?
I love to paint.  I love to draw.  I love creating with my fingertips.

With that said, I haven't painted a picture since I had children.  They, by no means were the reason for that.  I just used it as an excuse.  In my lack of using my own art skills, I fear I may have not shared the very thing I have loved so dearly since before I can remember:  Art.

Through Pinterest, I discovered a wonderful blog called The Artful Parent.  I think I may find that is a great resource for me as I try to rediscover what I love about art and show my kids that they can love art too.  Of course, I'm not going to force it on them, but at the ages that they are now, they all love to grab a paintbrush and have at it!

In the process of painting watercolor painting with all three of my kids, I learned a few things.

1)  DO prepare.  DON'T tell your kids what you are preparing for, otherwise, they will "help" with the preparations a little too much.
2)  DO have the right supplies.  I got out my six-year-old tubes of water color and couldn't open half of them.  The other half were dried up.  I had to scramble for more paints.
3)  DON'T paint with all three of your kids, ages 20 months, 3 years, and 5 years, without taking a chill pill before hand.  Prepare your mind for stress.  (i.e. spilled water, paint on table, hands, clothes, floor.  Kids falling out of chairs trying to reach for paint.  Kids crying because the paint won't come off their hands.)
4)  DON'T expect to paint with them.  I did.  How silly of me!  I realized how private and relaxing painting is meant to be for me.  It doesn't mix with kids.  Period.
5)  DON'T worry about it if you don't really care to paint or for the Arts.  DO have your kids paint anyway.  It's good for them to be able to create anything their little minds think up.
6) DO, if you fancy it, paint a picture of your own after you clean up and put your kids down for a nap.  You will need it.

Upon finding The Artful Parent blog, I decided to do one art lesson a week, if possible.  Next week we will try watercolor with crayon resist!  I'm excited!


Left:  Paintings by Jackson.  Top Right:  Owen's painting.  Bottom Right:  Madelyn's painting.

Thursday, February 7, 2013

Day 21: Felt Story Board Travel Case

This might just be the neatest thing since sliced bread. I always enjoyed the Bible felt board stories growing up in Sunday School. If you put me in a circle of kids with someone telling a Bible story with the felt board, I still would be enthralled today! There is just something about the way the felt sticks to itself.

Well, enough about that! Let's get to the project! I found this quite popular pin several months ago. I think this would be the perfect thing for my kids to play with during the sermon on Sundays. The original pin used it for traveling purposes and it was a generic story board with cars and houses and such. Bible stories make it interesting, I hope, for the kids. So, my plan is to make a few more of these, but today, I started with Jonah and the whale. Jackson requested this story. It was easy enough and I really, really, really enjoyed it---all the way down to making Jonah's sideburns!

Supplies:
Tacky Glue or Sewing/Fabric Glue
Mod Podge or white glue
Sponge Brush
Permanent, extra fine tip marker
Fabric Markers (optional)
Assorted Felt
Googly eyes (optional)
Fabric Scissors
Travel Wipe Case

Instructions:
1)  Trace the bottom of wipe case onto felt for background.
2)  Cut out felt background.
3)  Brush Mod Podge onto the back of the wipe case and stick on felt background.
4) Draw onto felt the characters and peices you will need to complete your story (pick any story!).
5)  Cut the peices out.  Any peices needing to be glued can be glued with Tacky Glue or fabric glue.
6)  Let all the felt dry.
7)  Put all the pieces into case and give to your child or secretly play with it yourself.  I did.  (I had to make sure Jonah fit into the whale's belly!)


Wednesday, February 6, 2013

Day 20: Mod Podge Letter

Today I wanted to do a simple, yet creative craft.  A Mod Podge pin came to mind, so I cracked open my first bottle of Mod Podge.  Is it true that it's just glue and water?  Did I just pay five bucks for that?

Seeing that he could get into that white sticky stuff, my five year old was eager to help.  This craft is very easy---perfect for kids to help out with.  They can practically do the whole craft themselves!  This is well worth the total of 10 minutes it takes to make!

Supplies:
12" Paper Letter (I got mine from JoAnn's for $3.99)
12" x 12"scrapbook paper
Matte Mod Podge
Acrylic paint
Sponge brushes
Scissors

Instructions:
1)  Trace letter onto scrapbook paper.
2)  Cut letter out.
3)  Paint sides of letter.  Painting the back is optional.  It depends on where and how it will be displayed.  Let dry.
4)  Apply Mod Podge to letter and put the letter cutout on top.
5)  Apply Mod Podge all over top of letter, working out any bubbles from underneath.  Mod Podge can be applied over the side of the letter, so everything looks nice and even.
6) Display and enjoy!

Jackson was a super-duper Mod Podge applier!  Just had to even things out a bit!  :)
Pretty, isn't it?


Sunday, February 3, 2013

Day 17: Balloon Rockets


This is a pin that Jackson has been asking to do for quite some time.  It was pretty easy, but the set up could have been easier if I used thinner string instead of yarn.   The idea is that you teach how real rockets push air through their engines to make them go fast.  So here it goes!


The Supplies:
Balloons
String
Straws
Scissors
2 chairs
Tape

The Instructions:
1) Cut string about 6 feet long.
2) Tie one end of string to chair.
3)  Thread string through straw.
4) Blow up balloon.  DO NOT tie it.
5) Pinch balloon with fingers so air doesn't escape.
6)  Attach balloon with two pieces of tape over (running the tape over the straws and over the balloon).
7)  Release balloon!

I used three strings so the kids could each race a balloon.  They really enjoyed it.  I don't know about your kids, but there is nothing funnier to my kids than the sound of a balloon loosing it's air.  :)
 (Video of the big balloon race!)


Monday, January 21, 2013

Day 4: Lego Soap Dispenser

My boy loves Legos. He plays with them, talks about them, dreams about them. Now he can wash his hands with them. This was a super easy "craft" that my five-year-old really enjoyed putting together with me. And, I must add, he is just tickled with the idea of using the soap now!

Lego Soap Dispenser

You will need:
1 clear plastic empty soap dispenser (I used an old Soft-soap container and removed the label.)
Clear hand soap
12-15 Legos in a variety of colors

Directions:
Unscrew lid to the dispenser. Put in about 1/2 inch of soap. Then put in a few Legos. Keep layering soap and Legos until you fill the dispenser. Screw the lid back on. Wash your hands and enjoy!

Results: Easy to do!  Legos tend to float to the top, but that will only bug me, I'm sure.  :)

Remember, if you'd like to see any of these actual Pins of where these ideas originated, please follow me on Pinterest and follow the "30 Days of Pinterest" board.